32 channel DMX dimmer "pack" for LEDs/clusters/strips/bars (or
relays, solenoids, small motors, lasers, EL drivers, anything
DC powered)
(New version 2!)
ATTENTION: as of march 2016 I
can only sell to existing customers due to lack of time for
customer support. Thanks for your understanding.
This board is for sale!
Board size: 6.95" x 3.0",
with 6 holes for 6-32 screws; a set of 6 1/4" nylon standoffs are
provided. There are 4 holes at the corners (0.15" in from
board edges) and two near the middle, at 3.6" x 1.5" and 5.1" x 1.5"
relative to lower left corner.
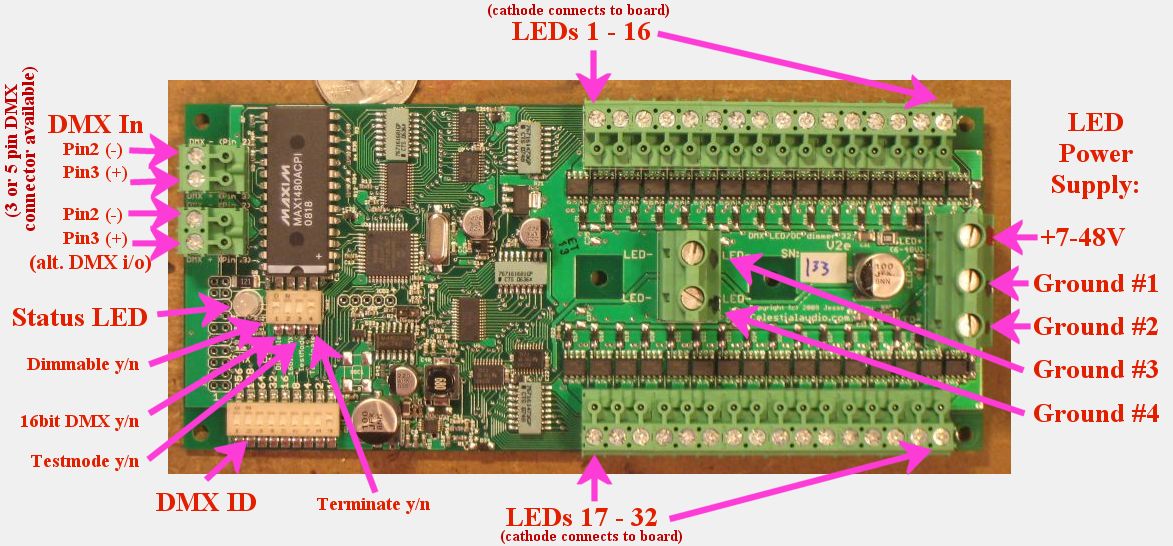
Top view:
(for Version 1 information, please go here)
Feature set:
- 32 channels with one
board! No more compromises due to not having as many
channels as you really want. If you're tired of the
expense and hassle of wiring multiple 3-channel dimmers to get
even a modest number of channels in your installations, this
board is for you. Example: you can run 10 separate RGB flex strips
or ropelight with smooth, precise, DMX controlled color mixing
with one board.
- Each channel can switch 8
Amps, total current capability of the board is at least 40 Amps continuous,
and up to 70 amps, depending on installation specifics.
- Each channel can switch up
to 48V for driving large clusters of LEDs
efficiently. Please consult with me if you will be using
> 24V.
- Each channel diode protected from inductive load switching
spikes, making it safe to use with solenoids, relays, small
motors, and unusual stuff.
- Fully (power and signal)
isolated DMX input, using the marvelous and not cheap
Maxim MAX1480 isolated RS485 transceiver.
- 4096 levels of dimming
at a pulse-width-modulation (PWM) refresh rate of 450Hz (can be 112Hz to
14.4Khz by request). This allows smooth fade up & down
from black with no flicker ever! Unlike cheap stuff that
doesn't even have specifications, this board was specifically
designed for theatre-quality dimming that can be photographed or
video recorded without flicker.
- LED brightness levels retained if DMX signal is lost.
- DMX start channel (1-511) set via DIP switch, changes are
immediate, status LED blinks orange to acknowledge setting
change.
- DMX termination on/off via DIP switch. No jumpers or
plugs to deal with!
- Dimming enabled on all channels yes/no via DIP switch to
protect non-dimmable loads from damage (relays, solenoids,
etc.).
- Test pattern via DIPswitch: fade up all channels to 10%, then
chase all channels, then repeat. Very handy for debugging
installations.
- High-resolution (16-bit) DMX input mode, selectable by DIP
switch, for ultimate precise brightness control.
- Supports the top speed possible with DMX: 512 channel frames @
44fps. No having to set a max fps rate, or a delay between
frames, or any other hacks some other DMX devices require.
- Multicolor status LED indicates DMX protocol or wiring error
(red), no DMX wire connected / no data on connection (green slow
blink), and valid DMX frames incoming (green fast blink).
- LED connection headers are a unique "pluggable" design: they
can be unplugged from the board, wires added/removed, then
plugged back in. They can be plugged in two ways: such
that the wires exit parallel to the board, the conventional case
(shown in picture) or straight up out of the board. This
allows for much easier installation and for moving
installations, since the board and the LED clusters are easily
separated.
- Board electronics runs from 7-48V DC, using the same power
supply as your LEDs. At 12V the current draw is
approximately 100mA.
- Up to 16 boards can run from a single DMX source, so a
complete DMX universe of 512 high-current channels can be easily
built.
Since this board is intended to be installed in an enclosure with
other equipment, and wiring requirements are highly dependent on the
installation, there is no case provided and the DMX connection is
with a terminal block instead of a bulky 3 or 5-pin XLR (either is
available by request). See wiring diagram below for details.
The basic operation is that this board switches the negative of your LED clusters
to the LED power supply's ground. This slightly
counter-intuitive method is called low-side switching, and is the
most common way things like this are done, since it is simpler,
cheaper, and more efficient than switching the positive of the LED
clusters (called high-side switching).
Wiring diagram:
is here. Some notes about
the wiring:
- LED cluster positives are
all
tied
together
with
thick
wire
to
the
positive
of the power supply for the LEDs (up to 48V).
- LED cluster negative goes
to
terminal
block.
This
can
be
a
thinner
wire,
since
only the current for that cluster goes down it (up to 8 amps).
- LED power supply positive and negative goes to LED power
terminal block (the large one on the right). The positive
can be a thin wire since this is only used for powering the
board and diode inductive switching protection. The
negative(s) needs to be thick wire (14awg minimum, 12, 10, 8 AWG
recommended), since the current for all the LED clusters goes through these
wires. For 10 amps or less total, a single negative
connection is fine. For 10-20amps total, two are needed,
and 3 recommended. For above 20amps all four are
required. The power supply should be located as close to
the board as possible.
- NOTE: this board doesn't do any current limiting. When
it switches a cluster on (i.e. the cluster's negative is
switched to ground) the effective resistance of that switch is
less than a tenth of
an ohm. Therefore the LED cluster has to be designed to
limit current to whatever the LEDs are rated for. Fuses
can also be added. I am happy to advise on LED cluster
designs.
Operation and testing:
- Turn off the LED power supply, and set the board DIPswitches
to: Dimmable ON, 16bit DMX OFF, Testmode OFF, Terminate OFF.
- Connect the LED power supply to the board. (+) is the
top position on the 3-position connector on the right, marked
with red paint. (-) is either of the two below it, and
either of the two on the 2-position connector in the middle of
the board.
- Turn on the LED power supply. You should see the status LED blinking green slowly.
If not, check that at least 7V is present on the (+) relative to
the (-).
- Now connect the (+) for one of your LED clusters/strips to LED
power supply + and the (-) to the power supply negative.
It should light up. This ensures it is working.
- Turn off the LED power supply, and wire the cluster in: the
LED cluster (+) goes to the LED power supply (+), either at the
big green board connector or at the power supply itself.
Wire the LED cluster (-) to channel 1.
- Turn on the LED power supply. The board's status LED
should again blink green slowly, and the cluster is off.
Now flip the "Testmode" DIPswitch to ON. The status LED
now toggles red & green rapidly. The LED cluster should fade up from
black to 10%, then flash full-on momentarily, then go off.
After 5 seconds or so this repeats. The board is doing a
fade-up of all channels to 10%, then chases all channels at
100%, then repeats. If the LED cluster doesn't light, or
stays lit, turn off power and recheck wiring. Also try a
different channel.
- At this time, you're ready to
wire! I don't have a good solution for how to
combine all the LED cluster (+) together; you can use multiple
wire-nuts, or get a multi-position terminal block and wire all
its pins together, or strip 8" of thick wire and solder the LED
cluster (+) to it. I've done it all these ways and
others. If you've got something handy, please let me know.
- I suggest wiring a half dozen or so channels and verifying
operation with the "Testmode" DIPswitch at this time. They
should all come up to 10%, then chase. Remember that
multiple thick, short wires from the board to the LED power
supply ground are required for high currents; see notes and
wiring diagram above.
- On to DMX: set the "Testmode" DIPswitch to OFF, choose the DMX
start ID (suggest 1) and set the 9-position DIPswitch for it
(for help with decimal to binary go here).
The
DIPswitch on the DMX32 is a little confusing. Firstly,
ignore the numbers 1-9 printed on the switch itself, instead
look at the "256","128","64", etc. printed on the circuit
board. These numbers are the "bit value" of the
corresponding switch; OFF= binary 0 and ON= binary 1.
Example: DMX ID 274 is "100010010" in binary, so the leftmost
switch ("256") is ON, the 128,64,32 are OFF, 16 is ON, 8 and 4
are OFF, 2 is ON, and 1 is OFF.
- Now connect the DMX cable to the board. If you have a
3-pin or 5-pin DMX cable, you can cut the end and screw the
wires into the terminal block (pin 2 and pin 3; pin 1 do not
connect) or use a 3 or 5 pin to wire pigtails adapter - I
normally have a few for $15. Either of the two DMX
terminal blocks can be used, there are two for wiring
convenience for multi-board installations. Top pin is DMX
pin 2, bottom pin is DMX pin 3.
- Flip the "Terminate" switch to ON, and plug into your DMX
source and turn it on. The board status LED should be
flashing fast green. If it is red (meaning garbled data):
the pin 2 / pin 3 is likely backwards or one is loose. If
it is slow green: no DMX is seen; double check the wiring, and
that pin 2 / pin 3 is correct, and that your DMX source is
outputting data.
- Now finally for the fun part!
If the DMX start ID is 1, and your DMX source is outputting data
for channel 1-32, you should be able to fade up and down your
installed LED clusters. If there is a lot of flicker,
check the DMX wiring; if one wire is loose there will be lots of
bad data. If the fade up/down looks choppy, compare it
with the fade up the Testmode does. Some lighting control
desks and software don't do smooth ramps; the fade up the
Testmode does shows the board's best capabilities.
Other notes:
- DMX requires that the last (and only the last) DMX device in a
network be terminated; please look elsewhere for more details
about this. The "Terminate" DIPswitch accomplishes this.
- The "Dimmable" DIPswitch is normally ON. For special
devices that can't or shouldn't be dimmed, turn this OFF.
Now if the DMX brightness value for a channel is 0, the device
is off, and for 1-255 it is fully ON.
- The "16 bit DMX" DIPswitch is normally OFF. For finest
dimming control possible (such as from a computer) this can be
turned ON, and the board combines two DMX channels (8bits &
8bits) to create one 16-bit dimming channel so you can set the
brightness to 4096 (12-bit) different levels.
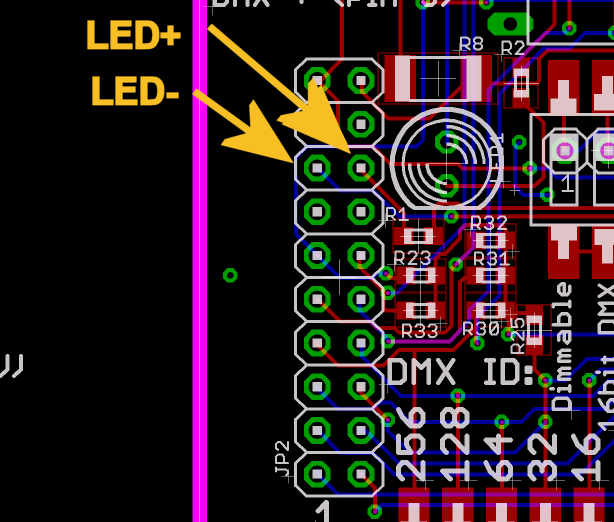
- An external status LED can be easily added, if you would like
something visible on the outside of an enclosure, etc.
Connect your red/green LED here
and you don't need a current-limiting resistor for it, there is
one already on the DMX32. The DMX32 uses digikey.com
160-1038-ND, I can include one for you, just ask. You may
find mouser.com 696-LXH600HGW-150 more useful, although you'll
need to wire it polarity-reversed to have its red/green match
the DMX32's red/green.
ATTENTION: as of march 2016 I
can only sell to existing customers due to lack of time for
customer support. Thanks for your understanding.
Price
& Quantity discounts:
Quantity 1-3:
$299
Quantity 4-8: $275 (8% off)
Quantity 9-15: $260 (13% off)
Quantity 16+: $250 (16% off)
Plus sales tax if shipped to a California address,
unless you have a resale certificate.
Payment methods & fees:
- Checks, personal or corporate or cashier, all checks from a
USA bank/credit union are welcome, as well as money orders.
- Wire transfer: +$10 for orders under $500, free otherwise
(I'll eat the cost).
- Paypal: +3.2% to cover fees for USA customers, 4.1% for
international. Paypal accepts credit cards.
- Bitcoin: no fees, contact me for details.
Shipping:
- I normally ship worldwide with TNT
but can use any carrier of your choice, and am happy to use your
shipping account.
- For USA, I ship UPS ground but of course I can use any speed
UPS/Fedex and your shipping account if preferred.
To order, please email me: jesse@celestialaudio.com
with some details about your project (a link to the LED fixtures,
wattage/current of each channel, how many on at one time, wire run
lengths, etc.) and I'll get back to you quickly, usually within 24
hours and will give you my cell phone# / Skype contact
details. If you don't hear from me within 2 days please email
again and provide an alternate contact email address and/or a
phone#. Approximately half the people who contact me have a
project with a deadline so I try to rapidly respond so that if the
DMX32 isn't suitable for your project you can look for alternatives
without wasting time waiting for me.
Useful accessories!
![[fuseholder]](perchan_angle_small.jpg)
![[distblock]](dist_front_small.JPG)
Please visit the accessories
page for info about fuse protection and power distribution
accessories to make your installation easier and safe from short
circuit failures.
DMX LED Home
Celestial Audio Home